Meet first Mondays, 7pm at the Sutton Arms, 10 West Street, Scawby, DN20 9AN
Contact: John North mobile no. 07914 086245 – email north8954@gmail.com
Or Steve Webb Tel. 01482 797810 – email lynne94@lynne94.Karoo.co.uk
Humber Centre Meetings & Events
Austin Seven Special “Pixie”
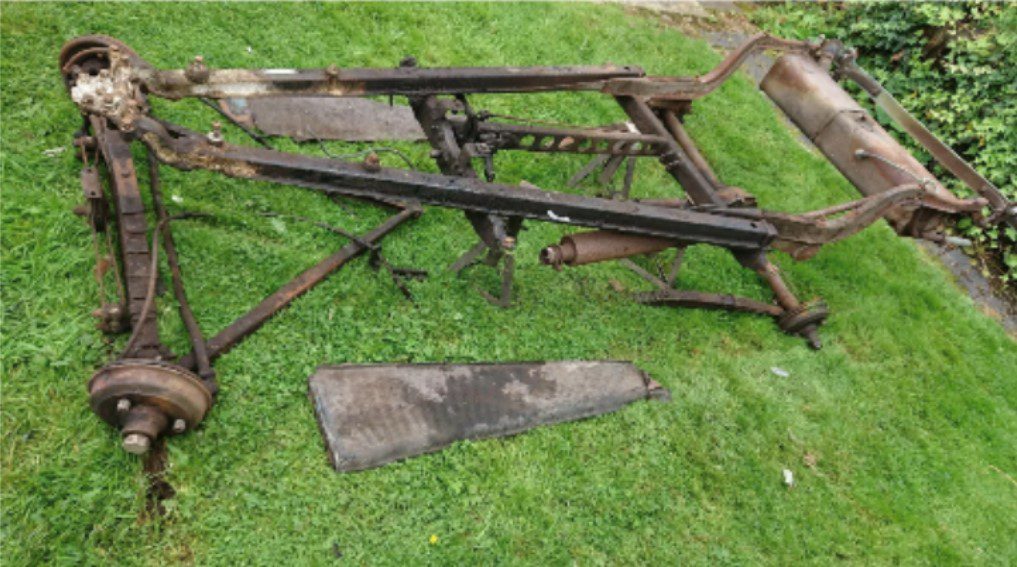
Picture the scene. It is September 2020, Covid has kept us occupied for the last few months, we are out of the first lockdown and bored one evening you are browsing eBay. More importantly you have been left unsupervised! A listing appears for a Ruby rolling chassis, engine, gearbox and a few other bits and pieces. Do you A.- Scroll past like a good husband knowing how much trouble you will be in if you end up buying it or B.- Ask for forgiveness after the cheeky bid you put on (never anticipating winning) wins the auction. The finger hovered over the “submit bid” button.

After watching and occasionally helping Bill and Shirley Tull build their fantastic little Bert Hadley car “Floppit” I’d been gently thinking about it. The ability to have a car that could be a competition car and a road car really appealed to me. I have raced with Bill and Shirley in another class before and Shirley is a quick driver so pitting my mediocre abilities against her again seemed like it could be fun. I also have a son who was getting close to driving age (he was 15 when I started and is 18 now) and was hankering after driving some of the other competition cars we have. Having a car at the lower end of the power/budget scale that he could learn to drive in sprints and hillclimbs seemed a fantastic proposition and a lot of fun.
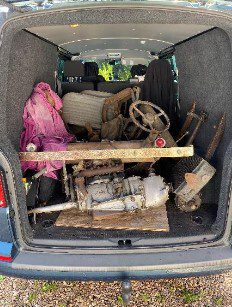
Back to the eBay auction and option B. was chosen. A bid was submitted and a nervous wait eschewed. Incredibly not many bids went on and I won the auction. That weekend a trip to Manchester was made from the depths of North Lincolnshire and with suitable social distancing my son, daughter and I loaded up all the parts into the back of my van and we brought it home. I have to say I have an incredibly understanding wife who supports me in all the mad car things I have ever done. However, when we arrived home and I opened the back of the van to proudly show her my purchase she just stared at me and said “why have you bought a load of rusty scrap!!!!”, shook her head and walked back inside. Clearly a significant amount of forgiveness was going to be needed.
Once I’d unloaded everything the rebuild could then begin in earnest. I started off checking over all that I had bought and making a use pile, a sell on pile and a leave it to sort later pile. When I knew what we had I began the long process of cleaning decades of oil and rust from everything. After it was clean I sent off what bits I could to be blasted and the rest we cleaned up the old-fashioned way with wire cup brush in the drill or angle grinder.
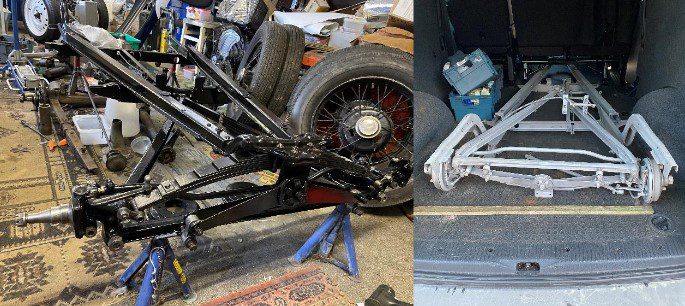
With everything clean a nice coat of gloss black Rustoleum paint was added and following new bushes and any hardware that needed replacing the chassis was put back to being rolling again. Bill helped me strip the engine and clean it all up. It was in surprisingly good condition and all the bearings and white metal were good so we honed the cylinders, put new rings and gaskets on, lapped all the valves back in and built it back up. New clutch linings were added and springs on the fingers of the clutch. Initial inspection of the box was that this looked ok but we wouldn’t know for sure till it was running. It was flushed out though and new oil added. On the suspension side all new seals and bearings were done so we had the best chance of things being ok.

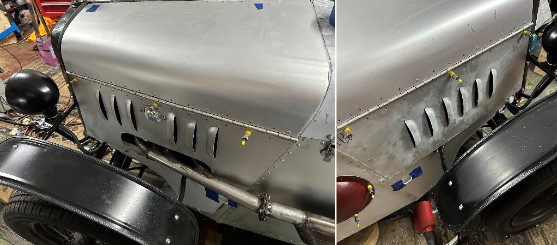
The body was of a steel box construction initially in the style of a Cambridge/RTC type of rear end (this was changed at the last minute just before I painted it as I always liked boat tails and decided to change it to have one). It has also been modified a bit in the first instance to fit my son, from me starting the project to more recent times he must have grown at least 6 inches so I had to make alterations so he can actually fit in it. I then chose to use an idea that was done on my Formula Junior car and that was to rivet all the aluminum side body panels to the car making it a bit more rigid. I followed Bill’s advice with the top panels and made them removable for future maintenance jobs which inevitably it will need. I had to make a new bonnet and also cut down an old grill shell I got from Bill to finish the front end. I made my own louvre press from some steel bar I had to make the louvres in the bonnet (used a slitting disc in the grinder then pressed the louvres in). One fun part was the mesh over the hole for the card. I raided the kitchen cupboards and found that a tea strainer fitted perfectly. No stones going in there!
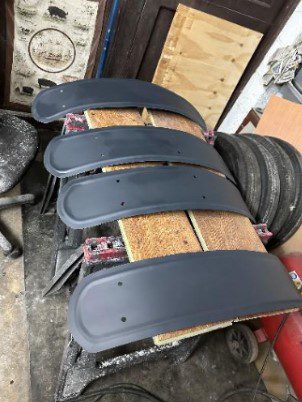
It took an age to make up all the little brackets that you need for a car like this but they were all duly made and gradually fitted to the car. The rebuild list got shorter and shorter. I’d been fortunate to be given some aluminum sheet and this was used extensively throughout. One thing I made myself from it was the cycle wings. I’d made some up in cardboard to get the size I wanted then Bill and my son helped me roll a bead into them. I’ve edged them with some cheap edging I bought off eBay.
My wife very kindly agreed to wrap the steering wheel in some string which looks awesome and we then coated it in boiled linseed oil to protect it (huge thanks to Carolyn here as she suffered with a few blisters wrapping the wheel).

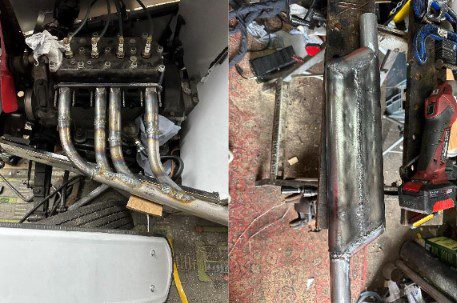
Like many parts I decided to make the exhaust myself. I’d got a smaller tube bender at home but borrowed a big conduit bender from work and set about it. I’d watched a youtube video on the Wragg special (thank you The Bracket Factory) to get some ideas and based the design on his. It all bent up okay and with some dodgy welding I hot glued it together. I made a brooklands style silencer from 2 pieces of 2” tube, I cut a slit in the tube, straightened it out and welded it together, a couple of offcuts made the front and back. It isn’t the best looking thing in the world but it does the job and sounds pretty decent to me.
For the dash I cut some circles from cardboard then sat in the car with some bluetak and tried them in different positions to work out where I wanted to put all the gauges so I could see them clearly. They are a mixture of the Ruby gauges and some I had from other projects.

As we had pretty much a nearly finished car Bill advised I contact the club about registering the vehicle. The club were fantastic and helped me with this process which proved to be fairly painless. Insurance was obtained and after a few weeks of watching the post a brown envelope from the DVLA arrived and I had my non-age-related registration number. I cannot thank the club enough for the help with doing this, all my seemingly daft questions were answered politely and promptly and we had a successful outcome.
Carrying on with the details now the lights on the front I bought off eBay and are cheap tractor units, the rears are Morris minor ones that I made the housings for myself from some aluminum tube offcuts.
The bomber seats I made myself. I sellotape some cardboard together to make a template and see if the size worked. I then used some thicker aluminum sheet I had and cut the holes out with a holesaw. I’d seen on youtube someone had made some dimple dies on a 3d printer so deciding this was a fab solution found the files and printed some of my own. They worked beautifully. I had some seat runners I could use on the driver’s side which has meant it is easy for me and my son to find a comfy driving spot (me up close and him miles back).

With the paint colour chosen I embarked on doing this myself. Having never painted a car before I was nervous of the results and have realized I chose the wrong type of paint in the tractor enamel I used. The finish is not perfect and I have a few runs here and there but hopefully when it fully cures in a month or two I can sand them out and buff it back up.
At the last minute I decided to change from the 17” Ruby wheels to a fantastic set of 15” wheels I got from a local club member to help with the initial acceleration I wanted when we started competing.
The final part was various fasteners and bonnet straps (cheap leather belts from eBay) and we were ready for the first test drive! We’d had the engine running before this but it went fairly well. We took the dog for a walk on the route I’d taken and didn’t find any bolts or other bits on the floor so took that as a win. Now we will just be running the car locally to iron out any teething issues and put some miles on the engine to run it in before we think about entering a competitive drive with it (the beauty of having a road car). The main problem so far is that the gear lever keeps dropping out of first and third (common it seems on a Ruby) so I need to put new springs and balls in the selectors (out comes the gearbox again). We have so far done about 25 miles in it. Awesome fun.
So from start with the initial purchase of the car on the 18th September 2020 to taking it for its first run on 16th June 2024 it has taken 3 years and 9 months to get it built. In some respects, it has taken so long due to the limited time I had to work on it and also that I tried to make everything myself to keep the costs down. I would say the whole thing has been put together for circa £3,000 which to my mind is incredibly cheap for a vintage car. If money were no option it would have been done far quicker and probably to a better standard but I did want to build it in the spirit of those early pioneers of the “special” in the 50’s and use or repurpose things I already had and keep the costs down as much as possible. eBay was my friend and keeping an eye on classifieds and asking local members if they had spares to sell also helped.
I know the car won’t win any events and might be a bit of an ugly duckling to some but I feel it shows what can be achieved with a bit of hard work and innovation to just go out and have some fun. Will it be fast…. No. Will it put a massive smile on our faces…. Yes.
Oh on one final note we decided we had to have a name for it. We based it on the colour and the “Pixie” orange is grown in Africa so she is now going to be known as Pixie (much to the delight of my daughter).
I’ve been collecting parts recently as well to make a bit more of a race engine over the winter so perhaps next year she will have a bit more oomph.
Thanks must go to my long suffering wife Carolyn, my son and daughter, Jake and Jessica, my brother in law, Peter and finally Bill Tull who I blame entirely for the whole thing and being a massive help with advice and assistance when called on.
Both Jake and I are looking forward to using the car and joining in the fun with the other competitors in the Bert Hadley Championship. Maybe do the odd trial too just for fun.

